Originally, I didn’t have much interest in 9mm AR’s. I didn’t like the look of the straight Colt magazines. I liked the rearward slant Glock magazine look even less. And I didn’t like the look of the small mag in the big magwell. The DDLES and QC10 type dedicated 9mm lowers solved the small mag, big magwell issue, but used the straight Colt or Glock magazines. Then I saw a photo of the new Sig 9mm MPX and really liked it. It looked like the love child of an AR15 and a MP5 and it got me to thinking.
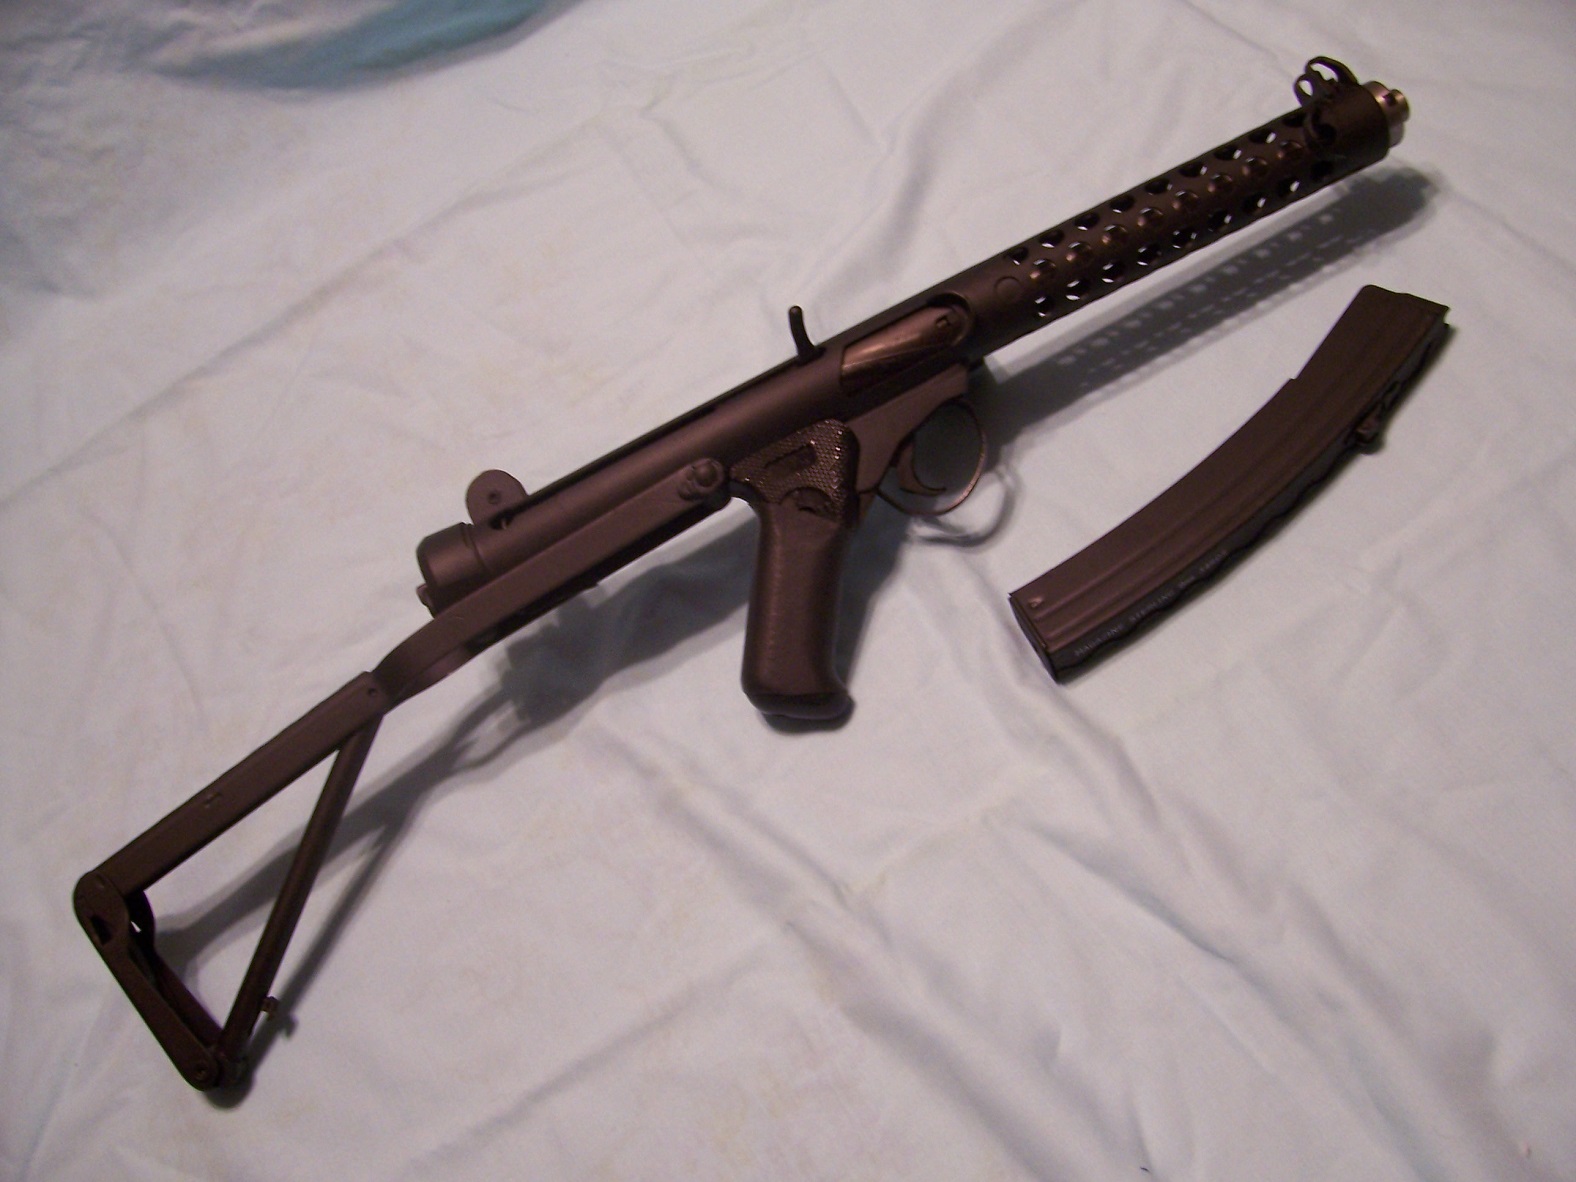
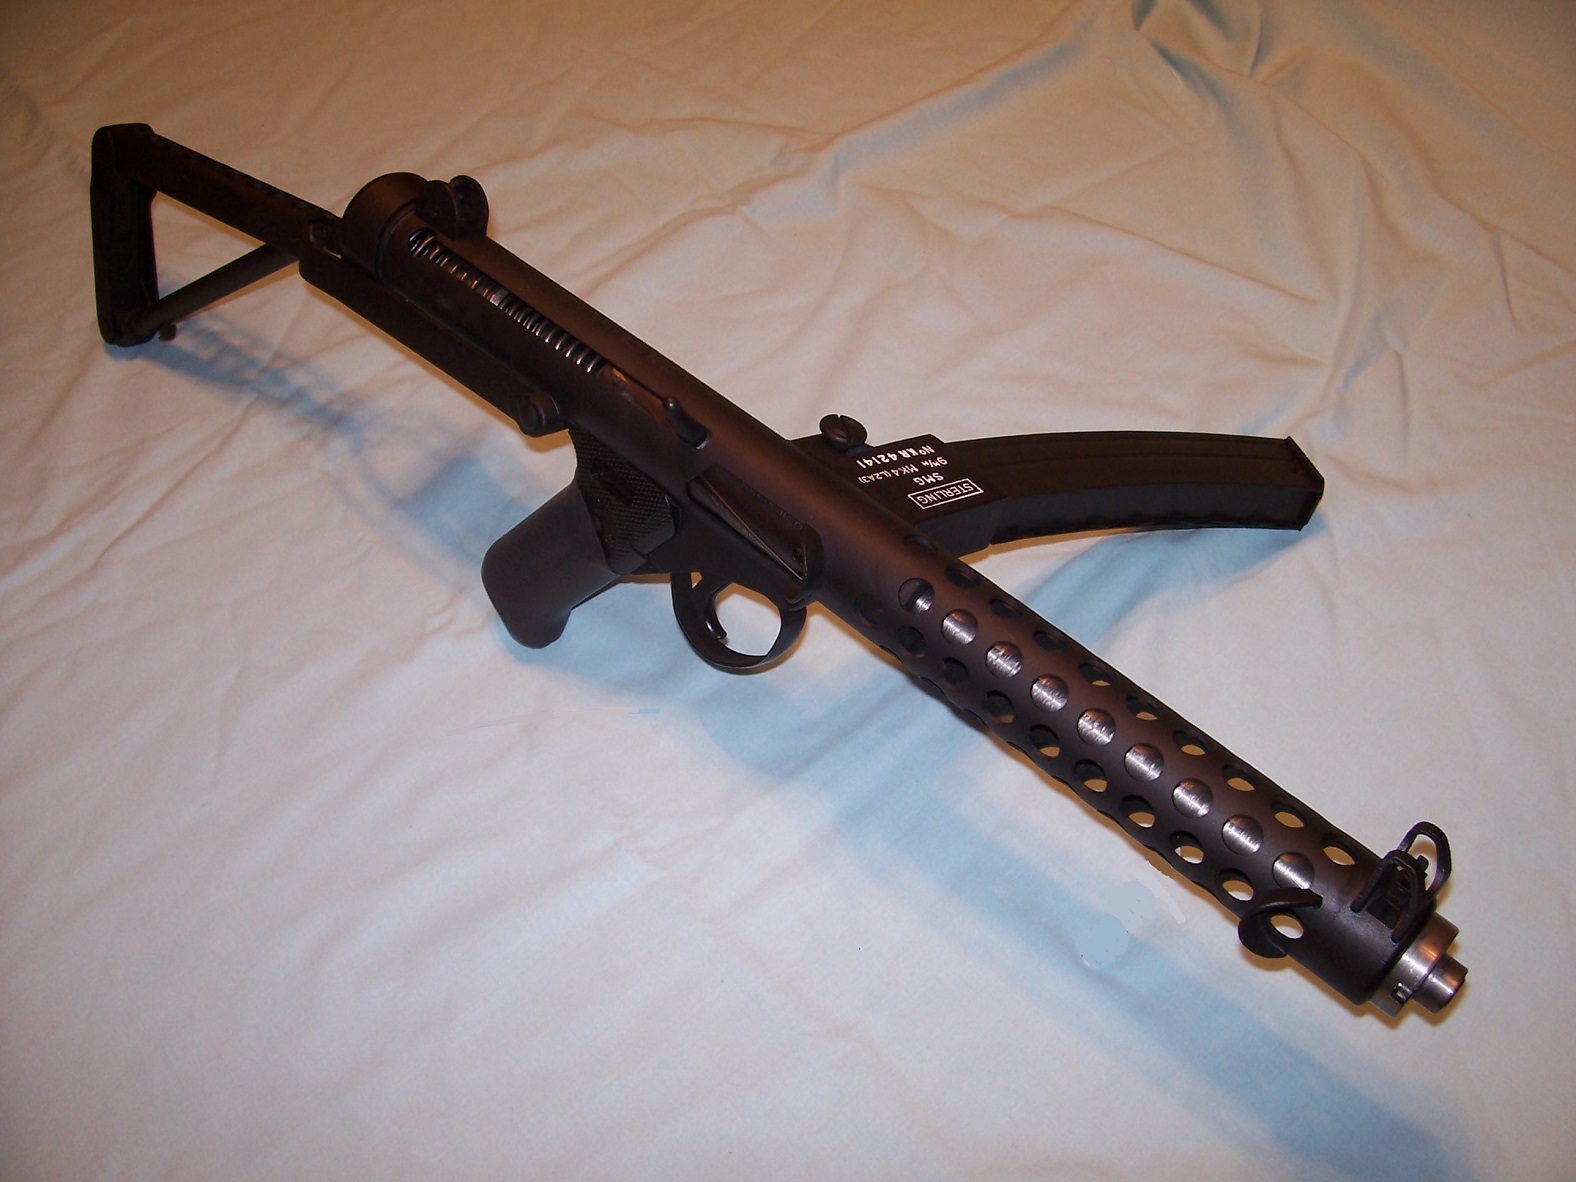
I bought a Wiselite/Sterling 9mm carbine several years ago and SBR’ed it. It is fun to shoot but it’s really, really heavy, 7.6 pounds empty, 8.6 pounds with a full mag. And the horizontal magazine when loaded, makes it kind of awkward. Regardless, the magazine with its double roller follower is the best. You can load 34 rounds with ease. And it looks like a 9mm subgun magazine should look – curved. Got me to thinking. Some 9mm AR magazine blocks use STEN Magazines. You can use STEN magazines in the Sterling. So redneck logic tells me I should be able to make a Sterling magazine work in an AR15.
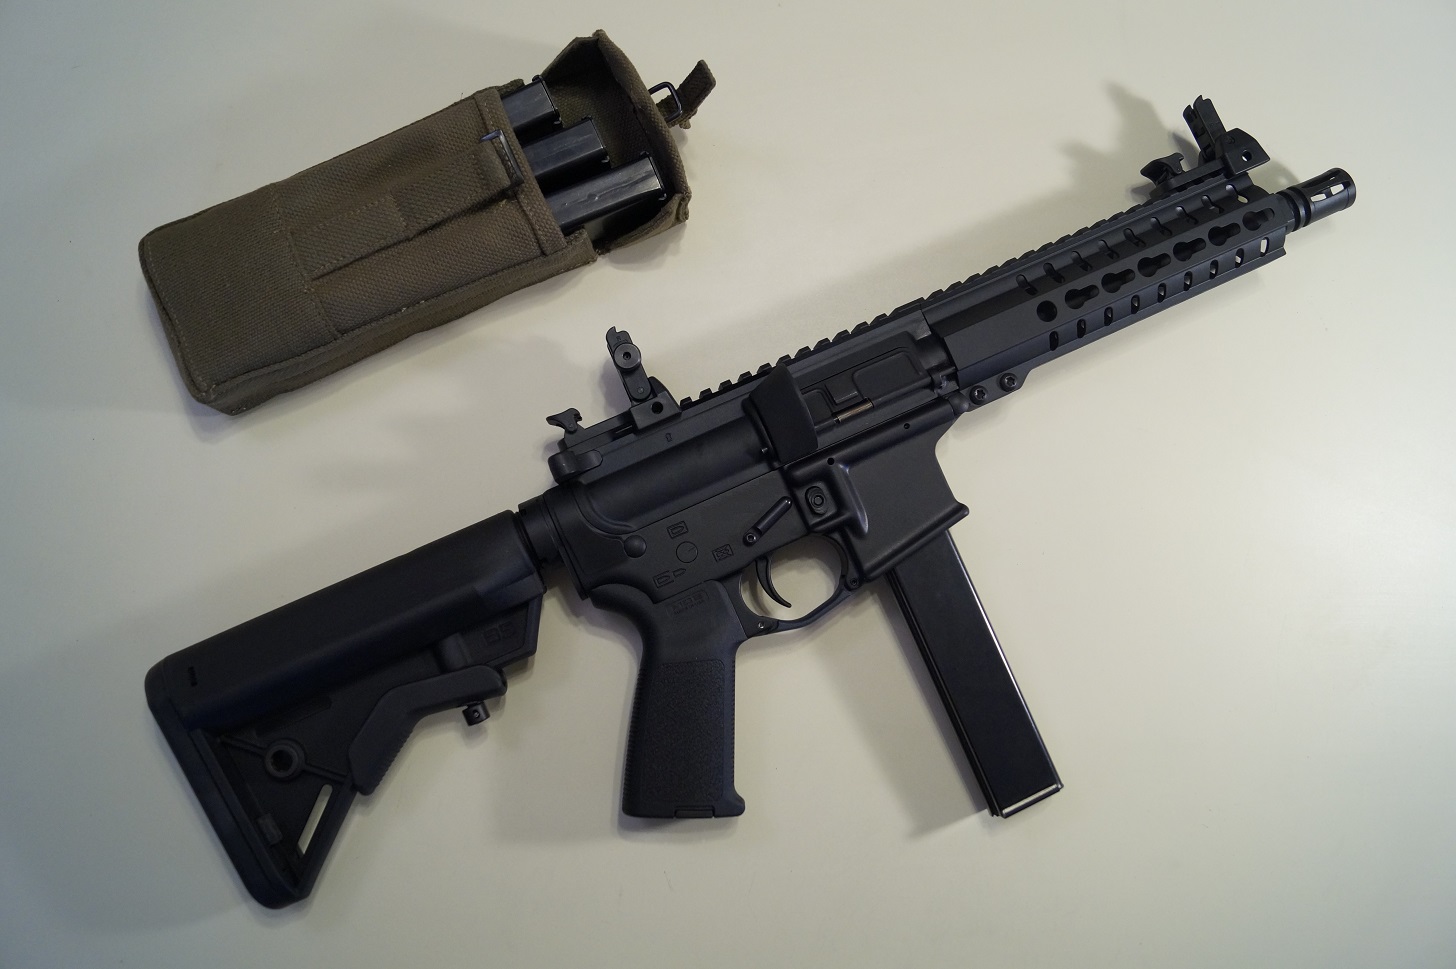
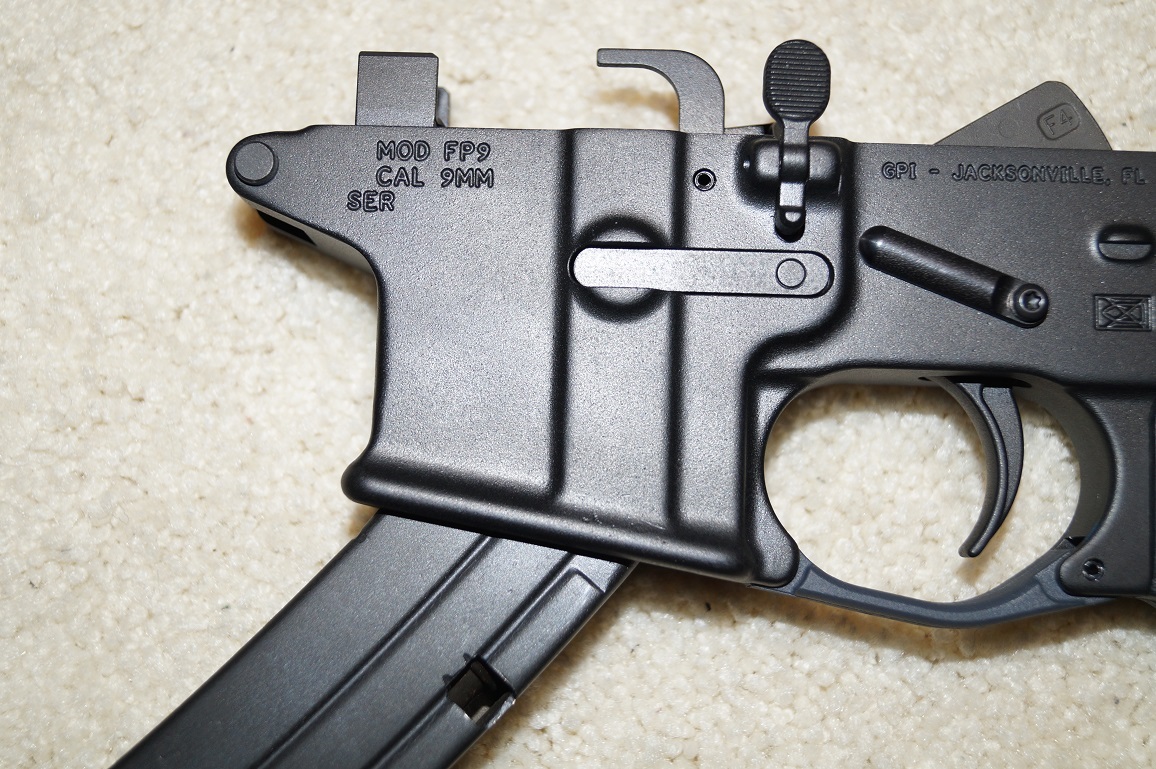
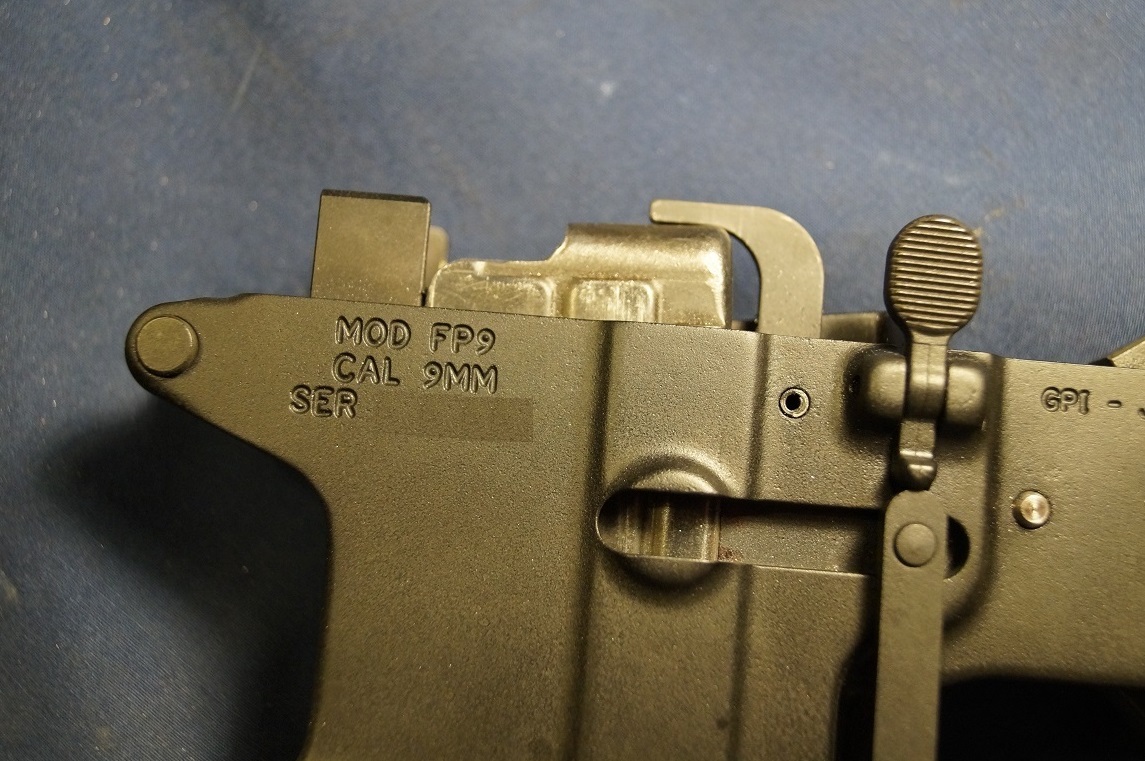
I bought two GPI 9mm dedicated lowers from Black Creek Precision in Jacksonville, FL. They are designed to use the Colt magazine. I sat down with one of the lowers and a Sterling magazine. I spent a couple days of studying and measuring, then got out the Dremel, some files and emery paper. After two days (off and on) of hand filing the magazine well and using the Dremel on the magazine body, I had a lower that would accept slightly modified Sterling magazines. The magazines would lock firmly in place, but still drop free at the touch of the magazine release button. I just recently got my Form 1 back, so I completed assembly of the gun. This is the result:
I’ve only had it to the range once, but it ran well right from the get-go. Research on AR15.com told me for a 9mm AR to run right, you need the right combination of spring, buffer and ammo. So I did a lot of reading before assembly. I went with a 7 oz. buffer, XP spring and subsonic 147 grain FMJ reloads. This combination has worked well.
The only down side to this design is the bolt will not lock back after the last round. But it doesn’t lock back on the Sterling or the MP5 either. I can live with it. The gun will actually still work with the original Colt-style magazines even though they fit loosely in the magwell. Specifics:
Upper: Lower:
RRA 9mm Upper Receiver Modified GPI FP9 9mm lower receiver CMMG ramped 9mm Bolt DPMS lower parts kit Adco 5” threaded 9mm barrel Magpul MOE grip Liberty Mystic Suppressor Wolff XP buffer springs Quentin Defense 9″ Keymod Rail Vltor A5 H4 Heavy 6.83 oz. buffer UTG A2 Rear sight, UTG front sight B5 SOPMOD Stock Modified Sterling SMG Magazines
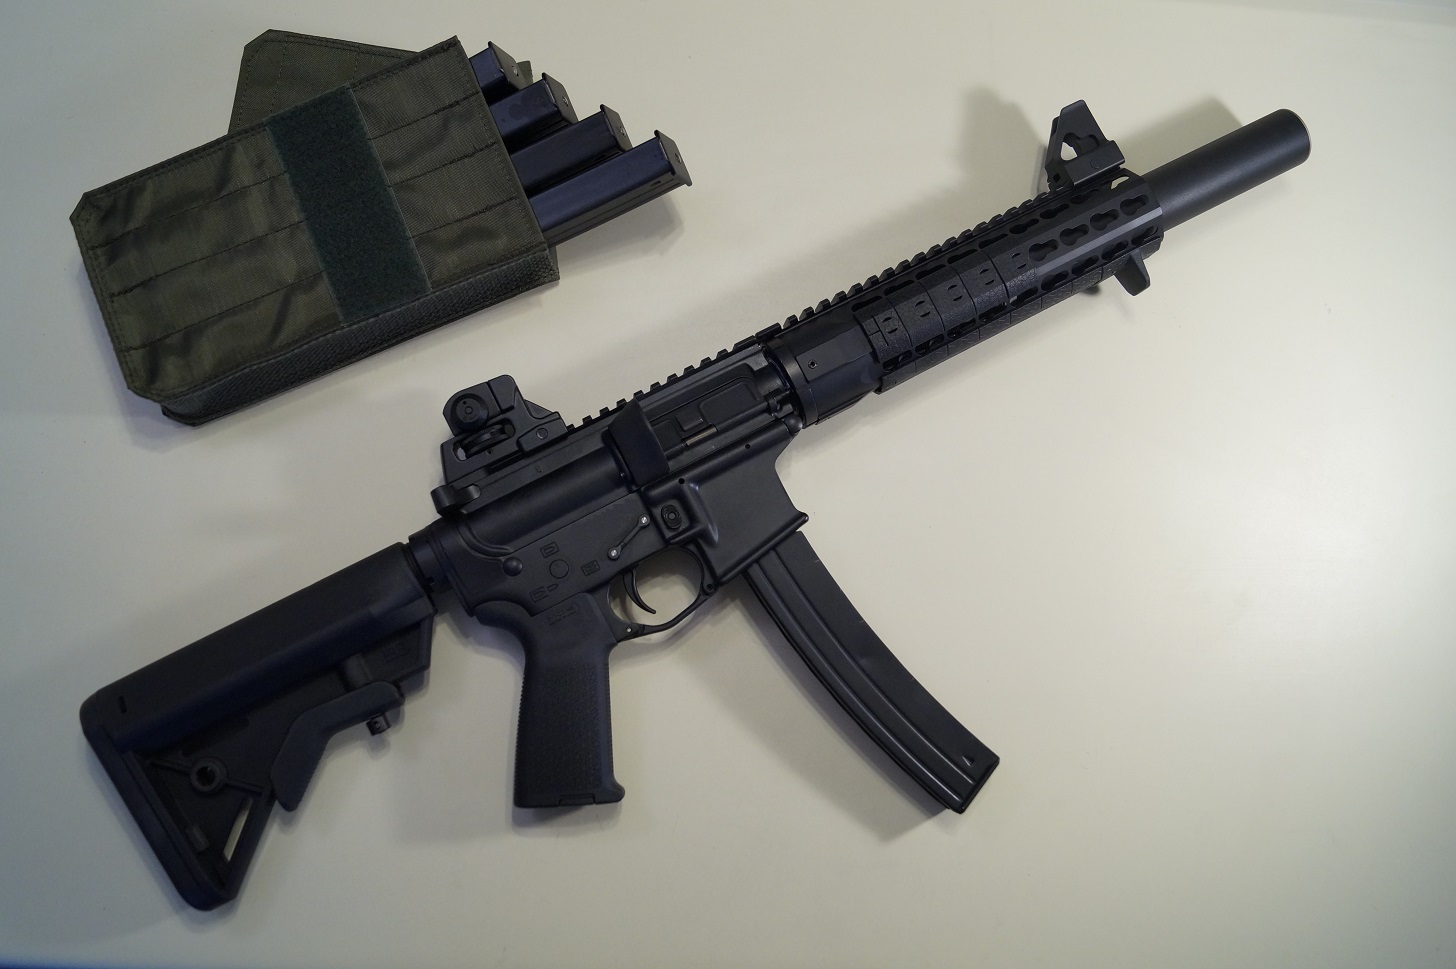
The other GPI lower currently remains unaltered. It will stay that way until I put a lot of rounds through the modified lower to ensure there are no hidden flaws with the design. I assembled it into a smaller package. Six months later, the Form 1 is in hand.
Specifics:
Upper: Lower:
RRA 9mm Upper receiver GPI FP9 9mm lower receiver CMMG Ramped 9mm Bolt DPMS lower parts kit CMMG 8.5” 9mm barrel Magpul MOE grip CMMG RKM7 Keymod Rail Wolff XP buffer springs A2 type flash suppressor Colt 9mm buffer UTG folding front and rear sight B5 SOPMOD Stock PSA Colt type magazines
Converting a dedicated 9mm AR receiver to use Sterling SMG Magazines
This is a two-step operation, modifying the Sterling magazine, then modifying the AR mag well to accept the modified magazine.
So the first step is to modify the magazine. There are two types of Sterling magazines. The commercial type is made from four separate pieces of sheet metal spot welded together. The other is the military type magazine. The military magazine has a one piece, extruded mag body or a two piece body with the seams machine welded. The military style magazine is the easiest to convert. The commercial version can be successfully modified, but requires some welding. We’ll cover modifying the military magazine first.
Converting the Sterling magazine is basically removing the protrusions, providing clearance for the AR bolt and cutting a hole in the magazine body for the AR magazine catch.
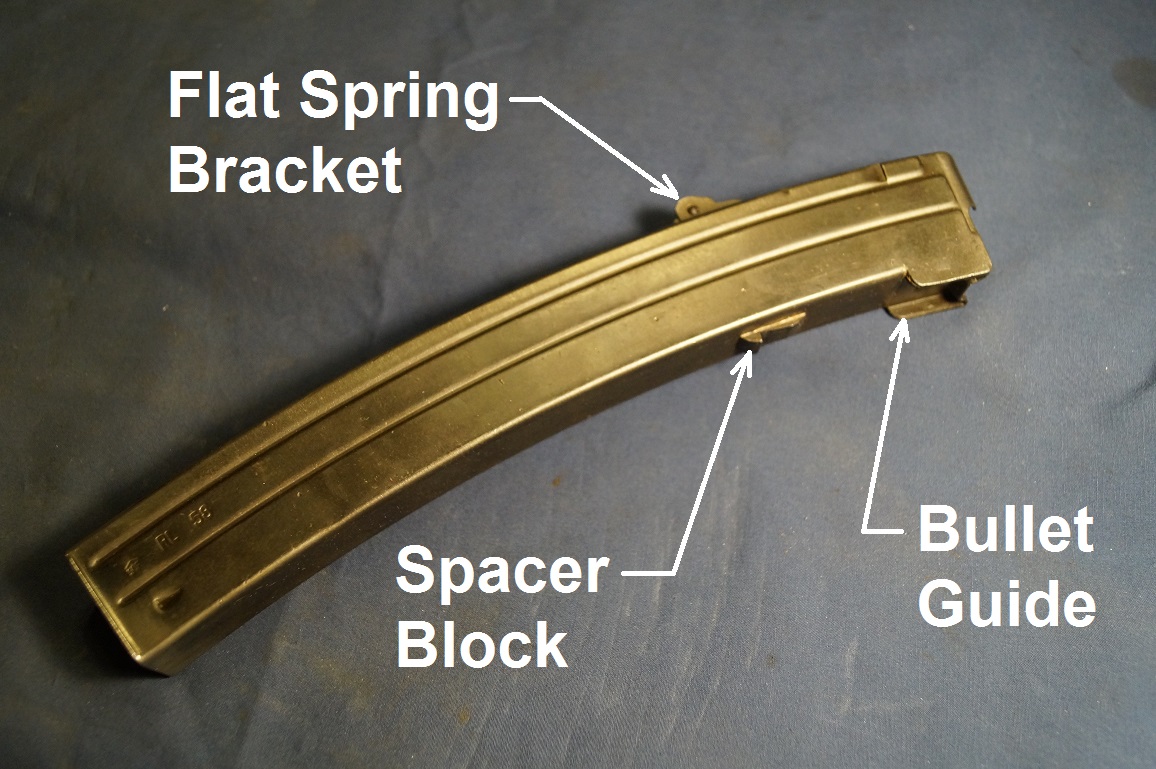
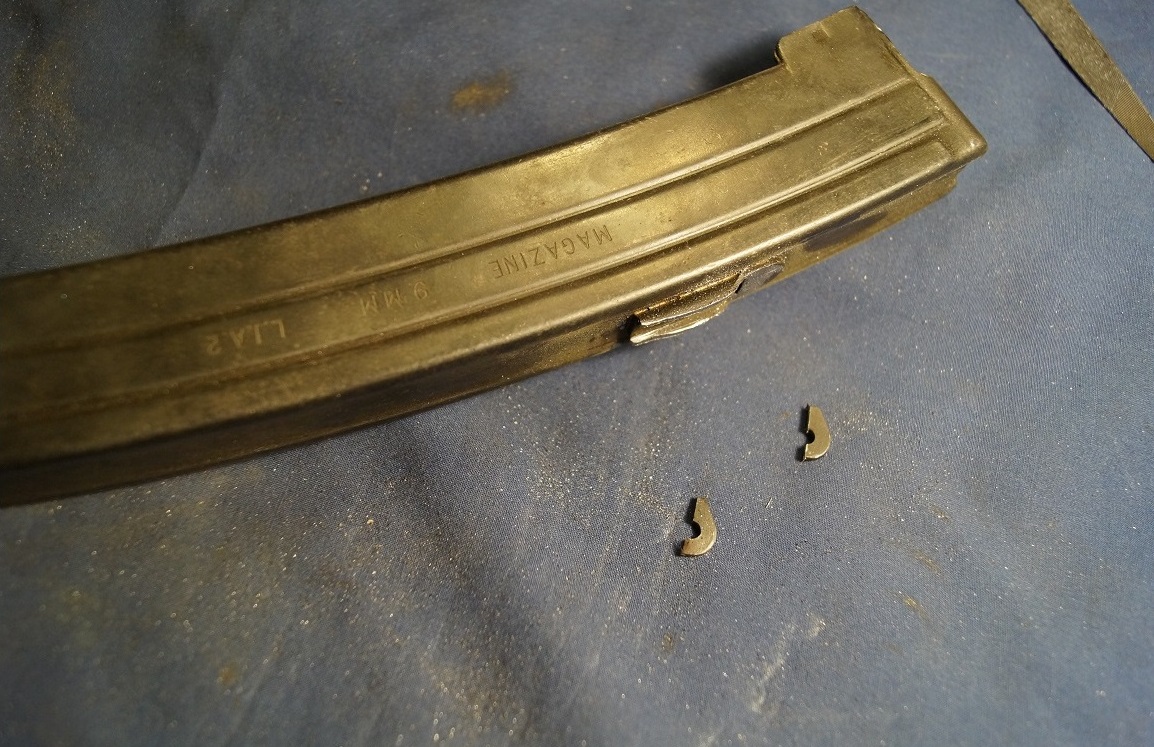
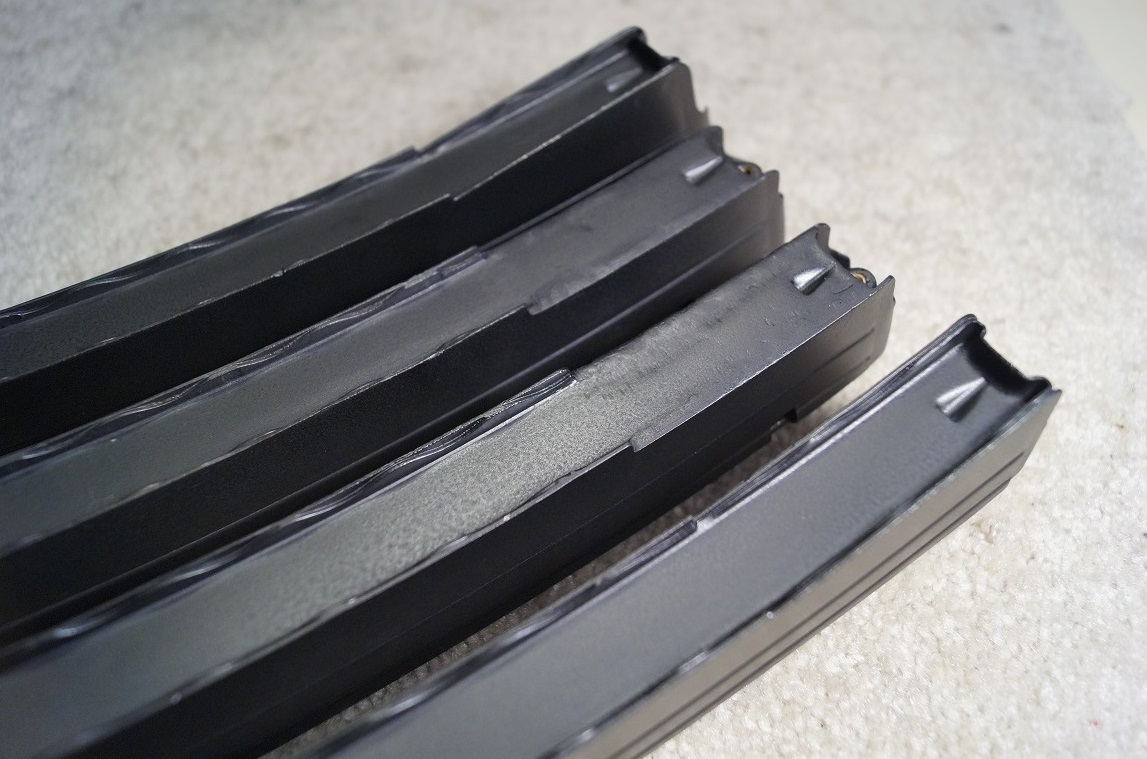
The protrusions we’ll be removing are the little metal spacer block on the front of the magazine, the flat spring bracket on the back of the magazine and the bullet guide at the top front of the magazine.
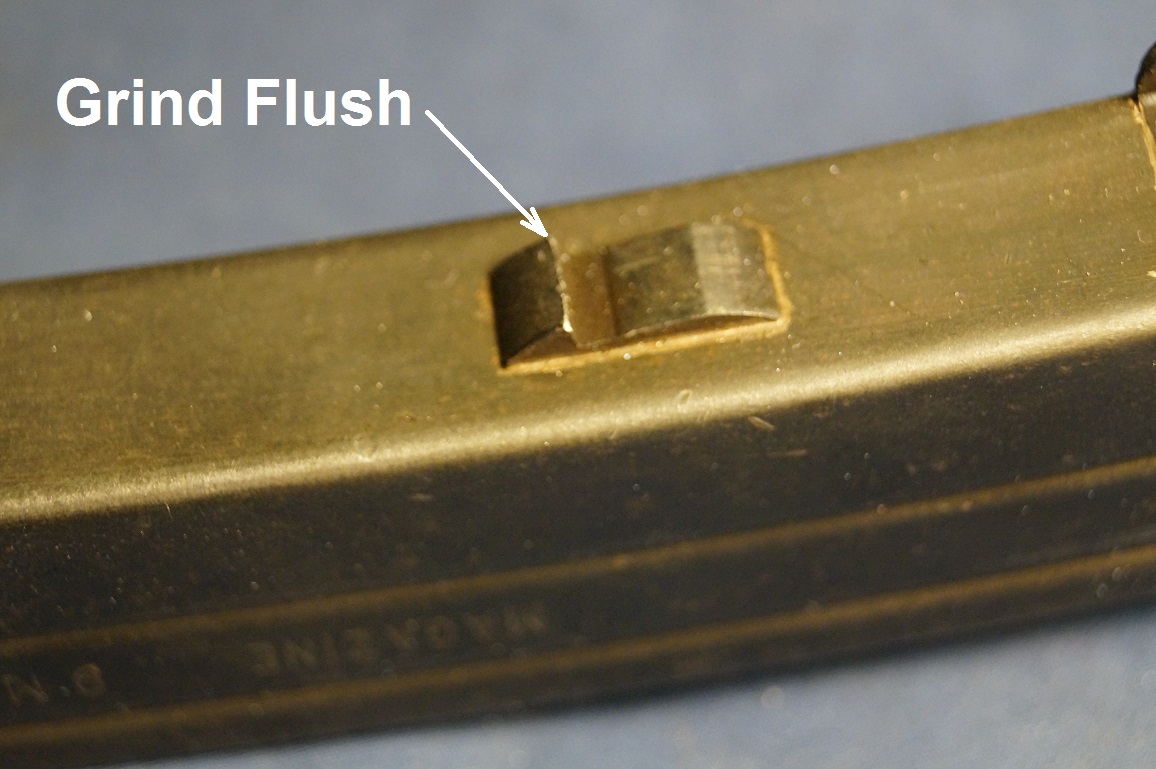
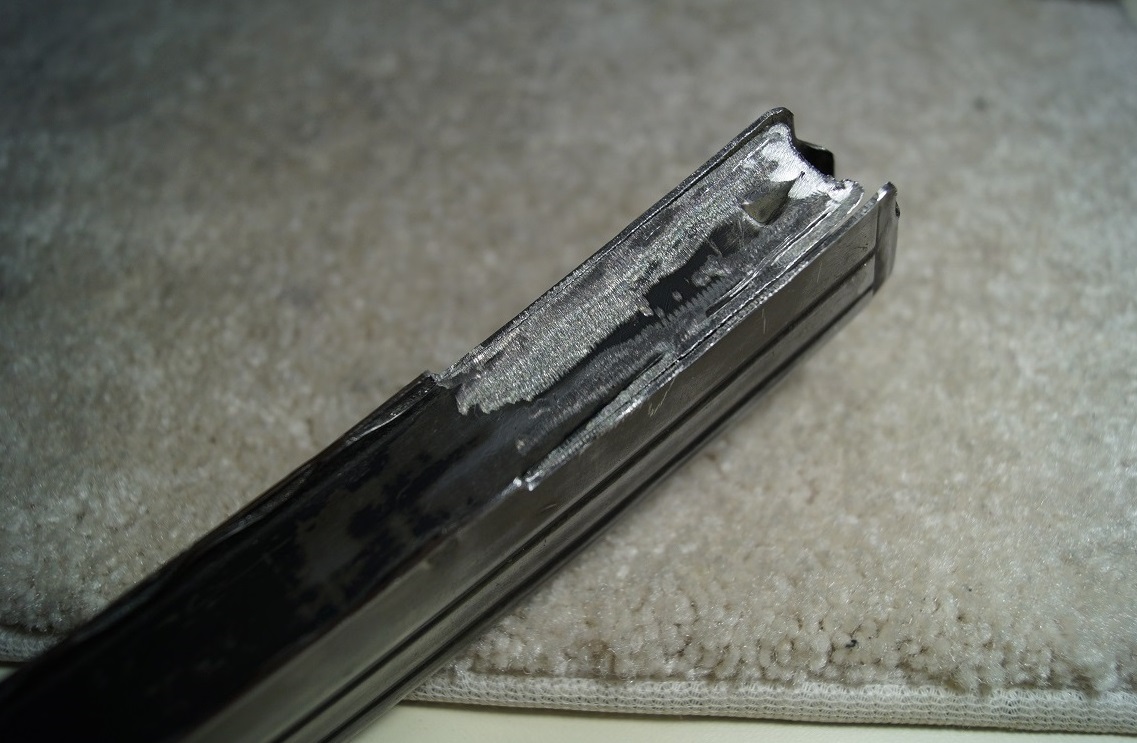
The block on the front is a solid block that is easily ground down flush with the mag body with a Dremel. You’ll know you’re just about flush when you get to the brass colored brazing material. After grinding it down, smooth the surface with emery paper.

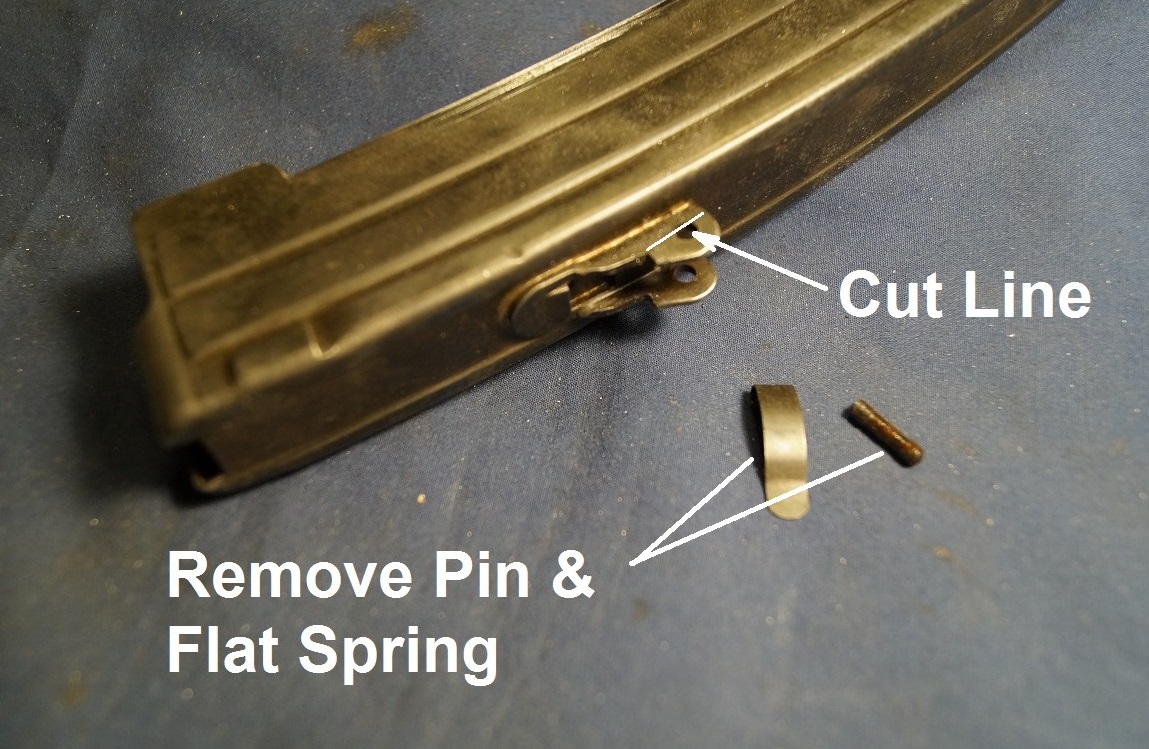
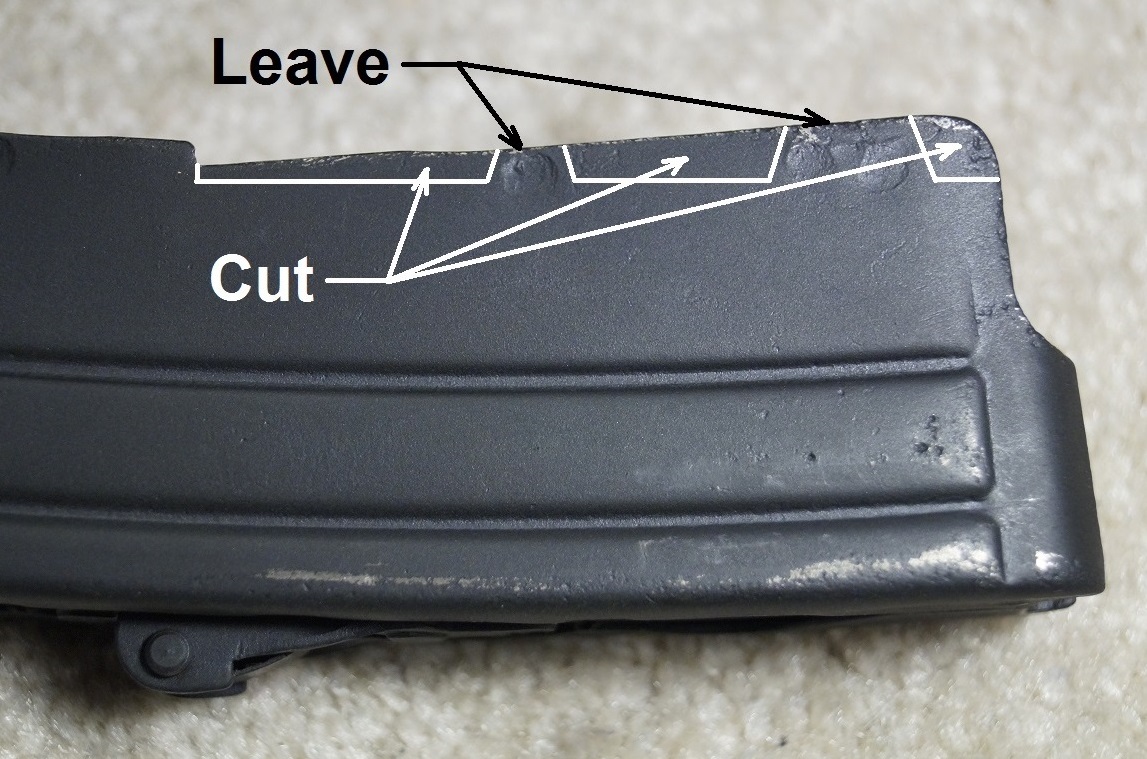
Before cutting on the spring bracket, drive out the pin and remove the flat spring. DO NOT GRIND THIS BRACKET FLUSH WITH THE MAG BODY! Cut through the pin holes at the cut line shown and just remove the part of the bracket shown. Leave the bracket as is for now.
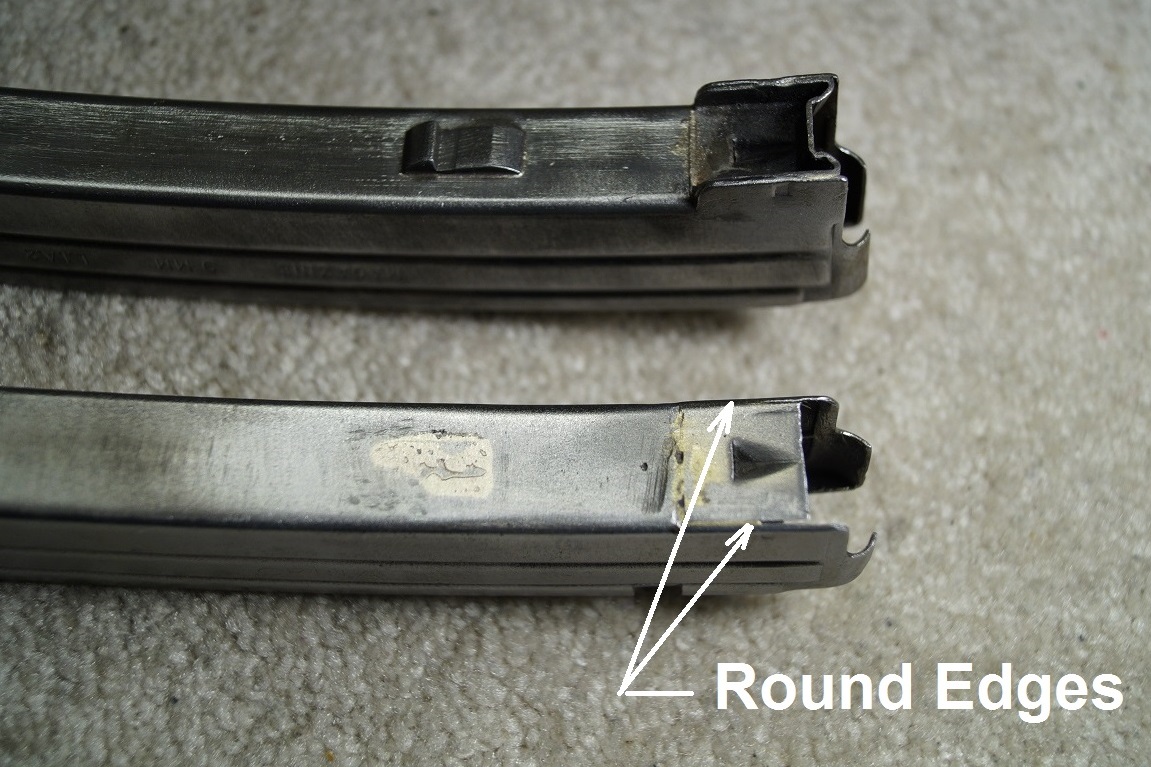
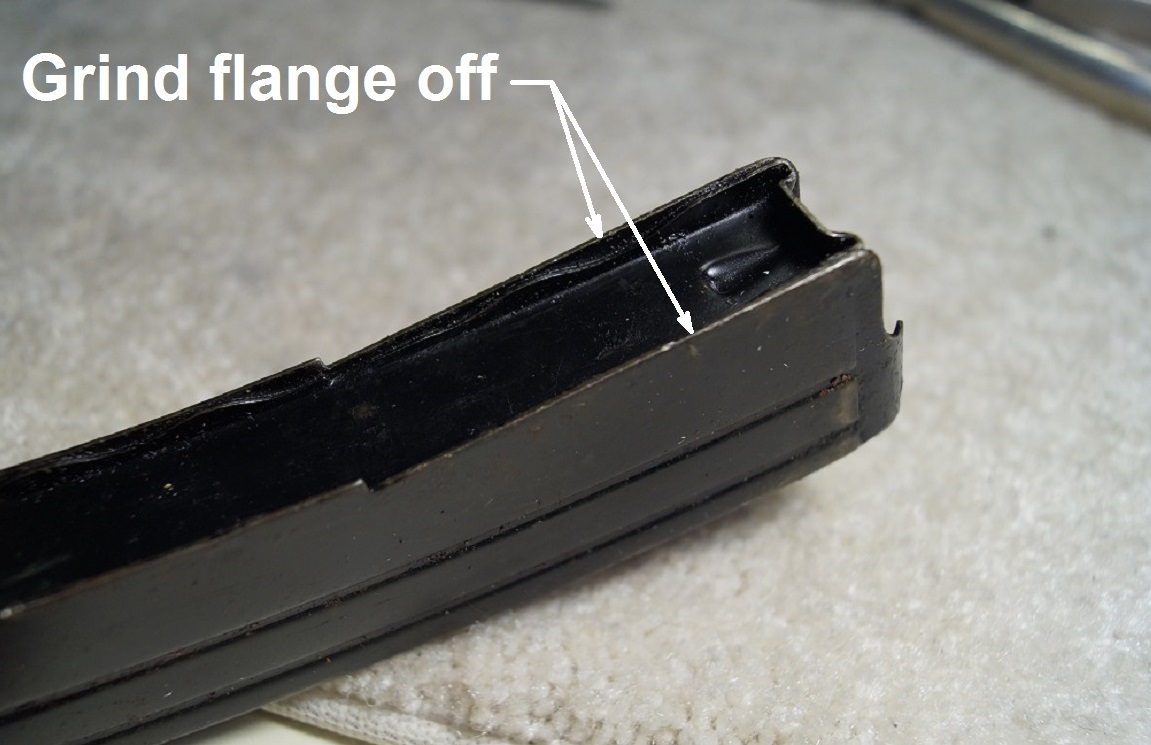
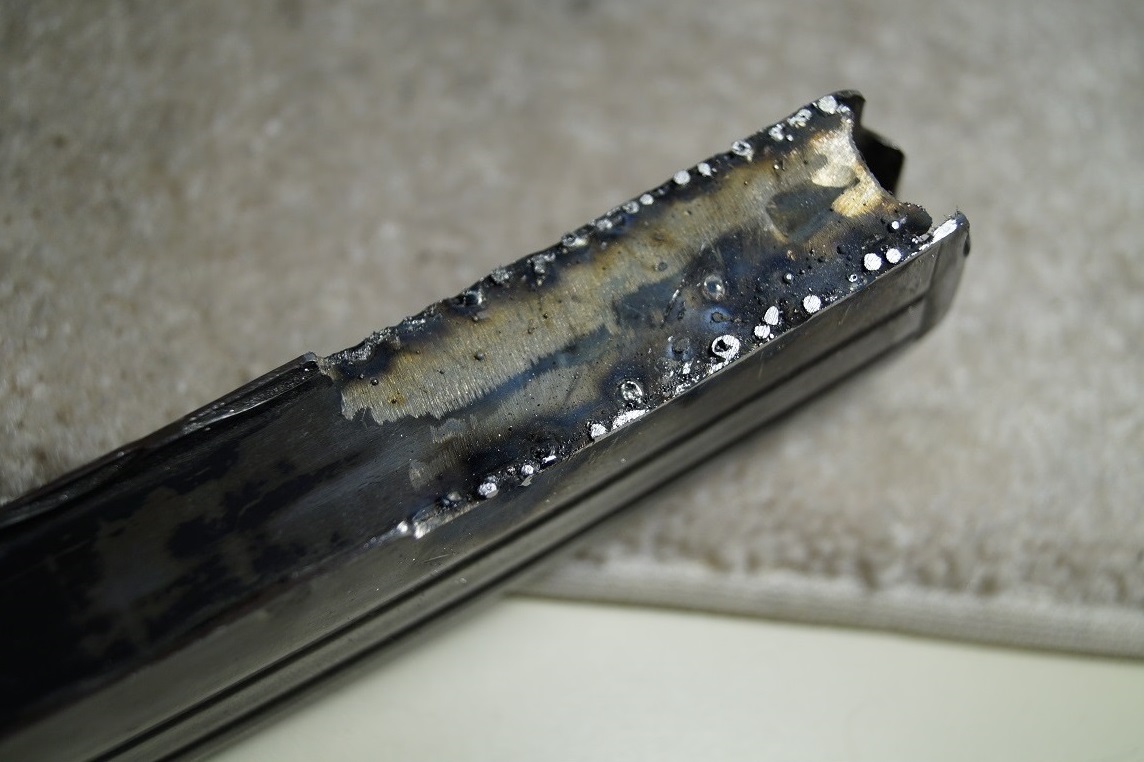
Cut the flanges of the bullet guide off, but not too close to the mag body. Then file or use a Dremel to grind the remainder down and rounding the edges until it matches the rest of the mag body profile. The top, front of the magazine may need to be trimmed to fit under the bullet guide on the receiver.
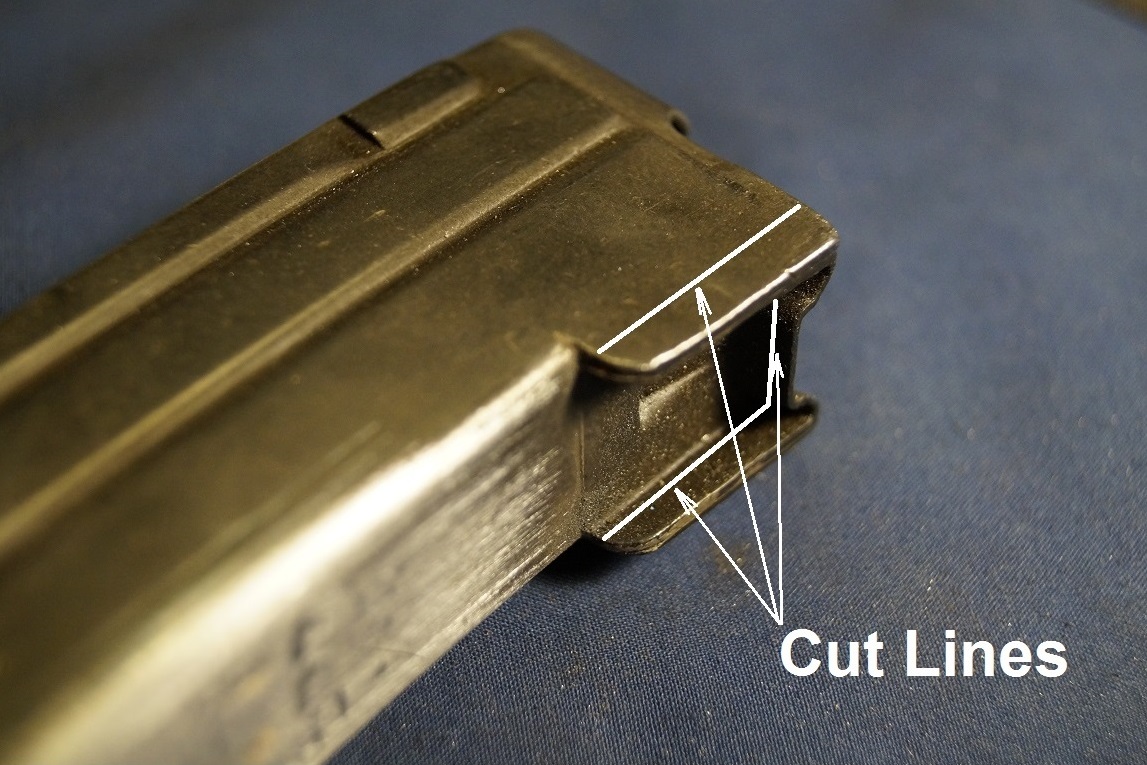
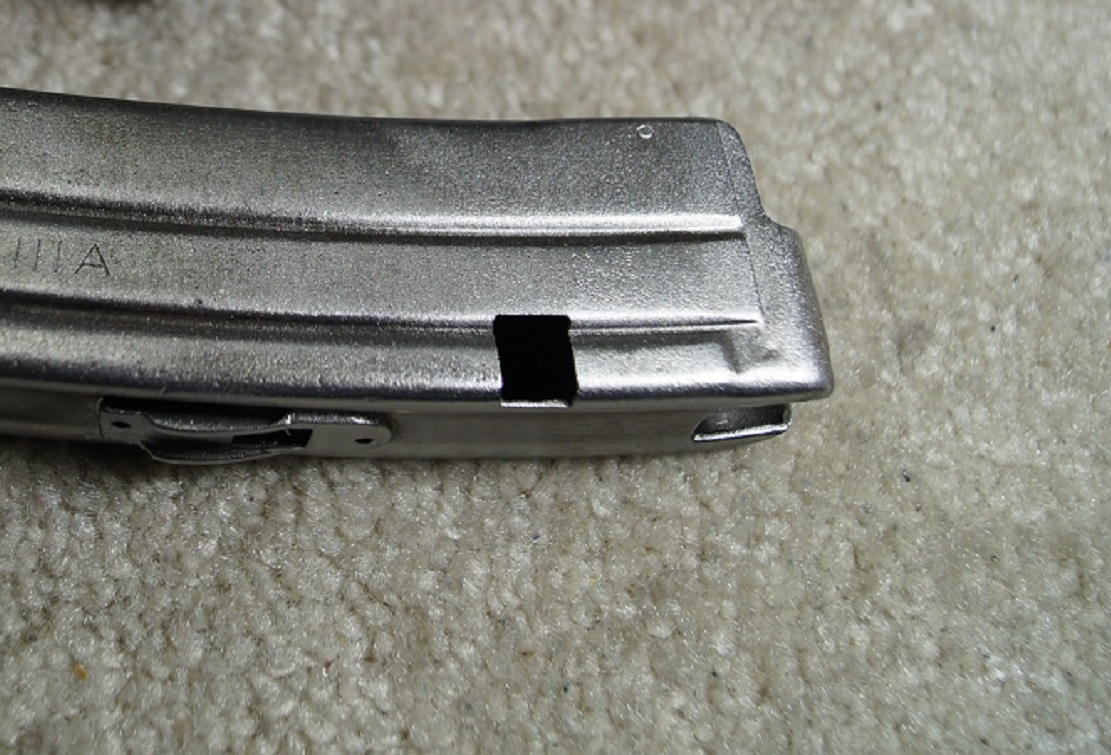
Cut the back of the magazine to match the cutout of a Colt style magazine. Cut the opening undersized to start. You’ll be able to fine tune it for bolt clearance after the magazine will fit in the AR magazine well. The notch in the Colt magazine is much larger than it needs to be.
The last thing I did was take emery paper and go over the upper part of the magazine that goes in the mag well to make it as smooth as possible with no burrs.
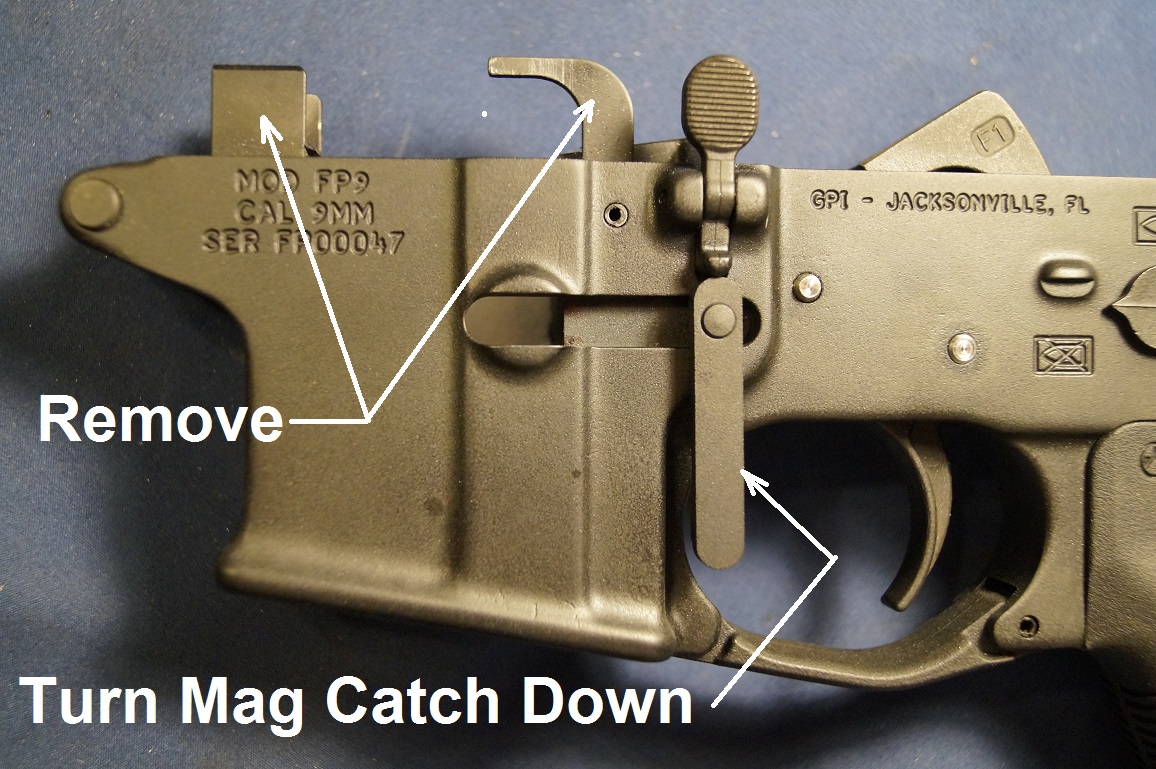
The next part is the most nerve racking – taking a file to the magazine well of a $200 lower receiver. Put the Dremel away. Use file and emery paper only. Before you start, either remove the magazine catch or push in the button and turn the catch down. If you don’t, you’ll be filing down the mag catch as you file the mag well. Also remove the ejector by driving the roll pin out and remove the bullet guide by backing out the set screw behind the pivot pin.

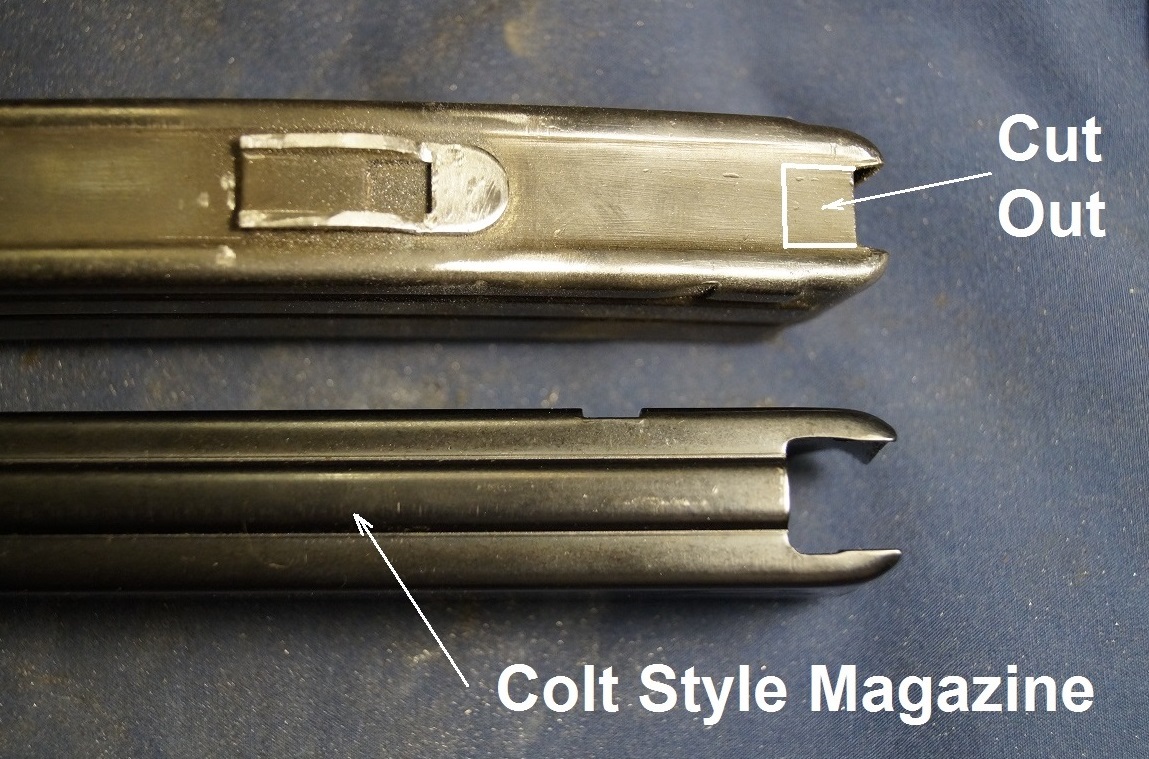
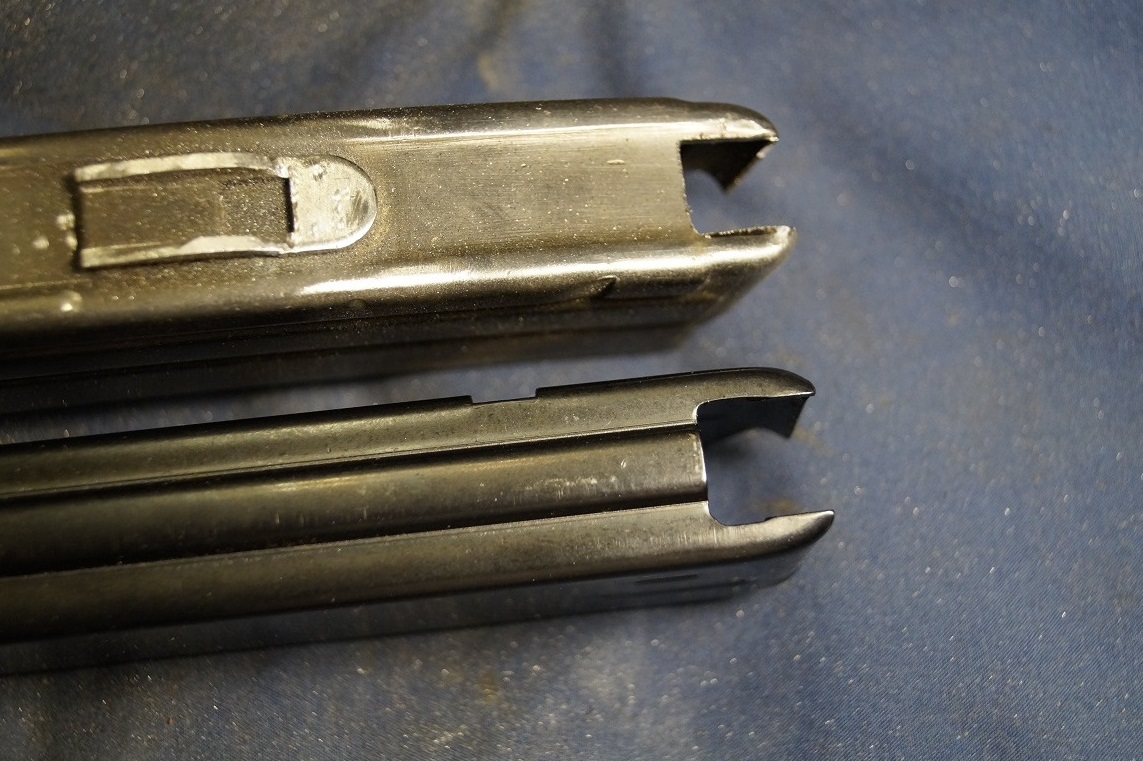
Before you pick up the file, study the mag well and the magazines. Take the floor plate off of the Sterling magazine and a Colt magazine. Compare the magazine cross sections by looking in the bottom. Both magazines are smaller in the front than the back; it’s more noticeable in the Sterling magazine.
Measuring all of the parts in question gives us an idea of how much metal we have to remove and where.
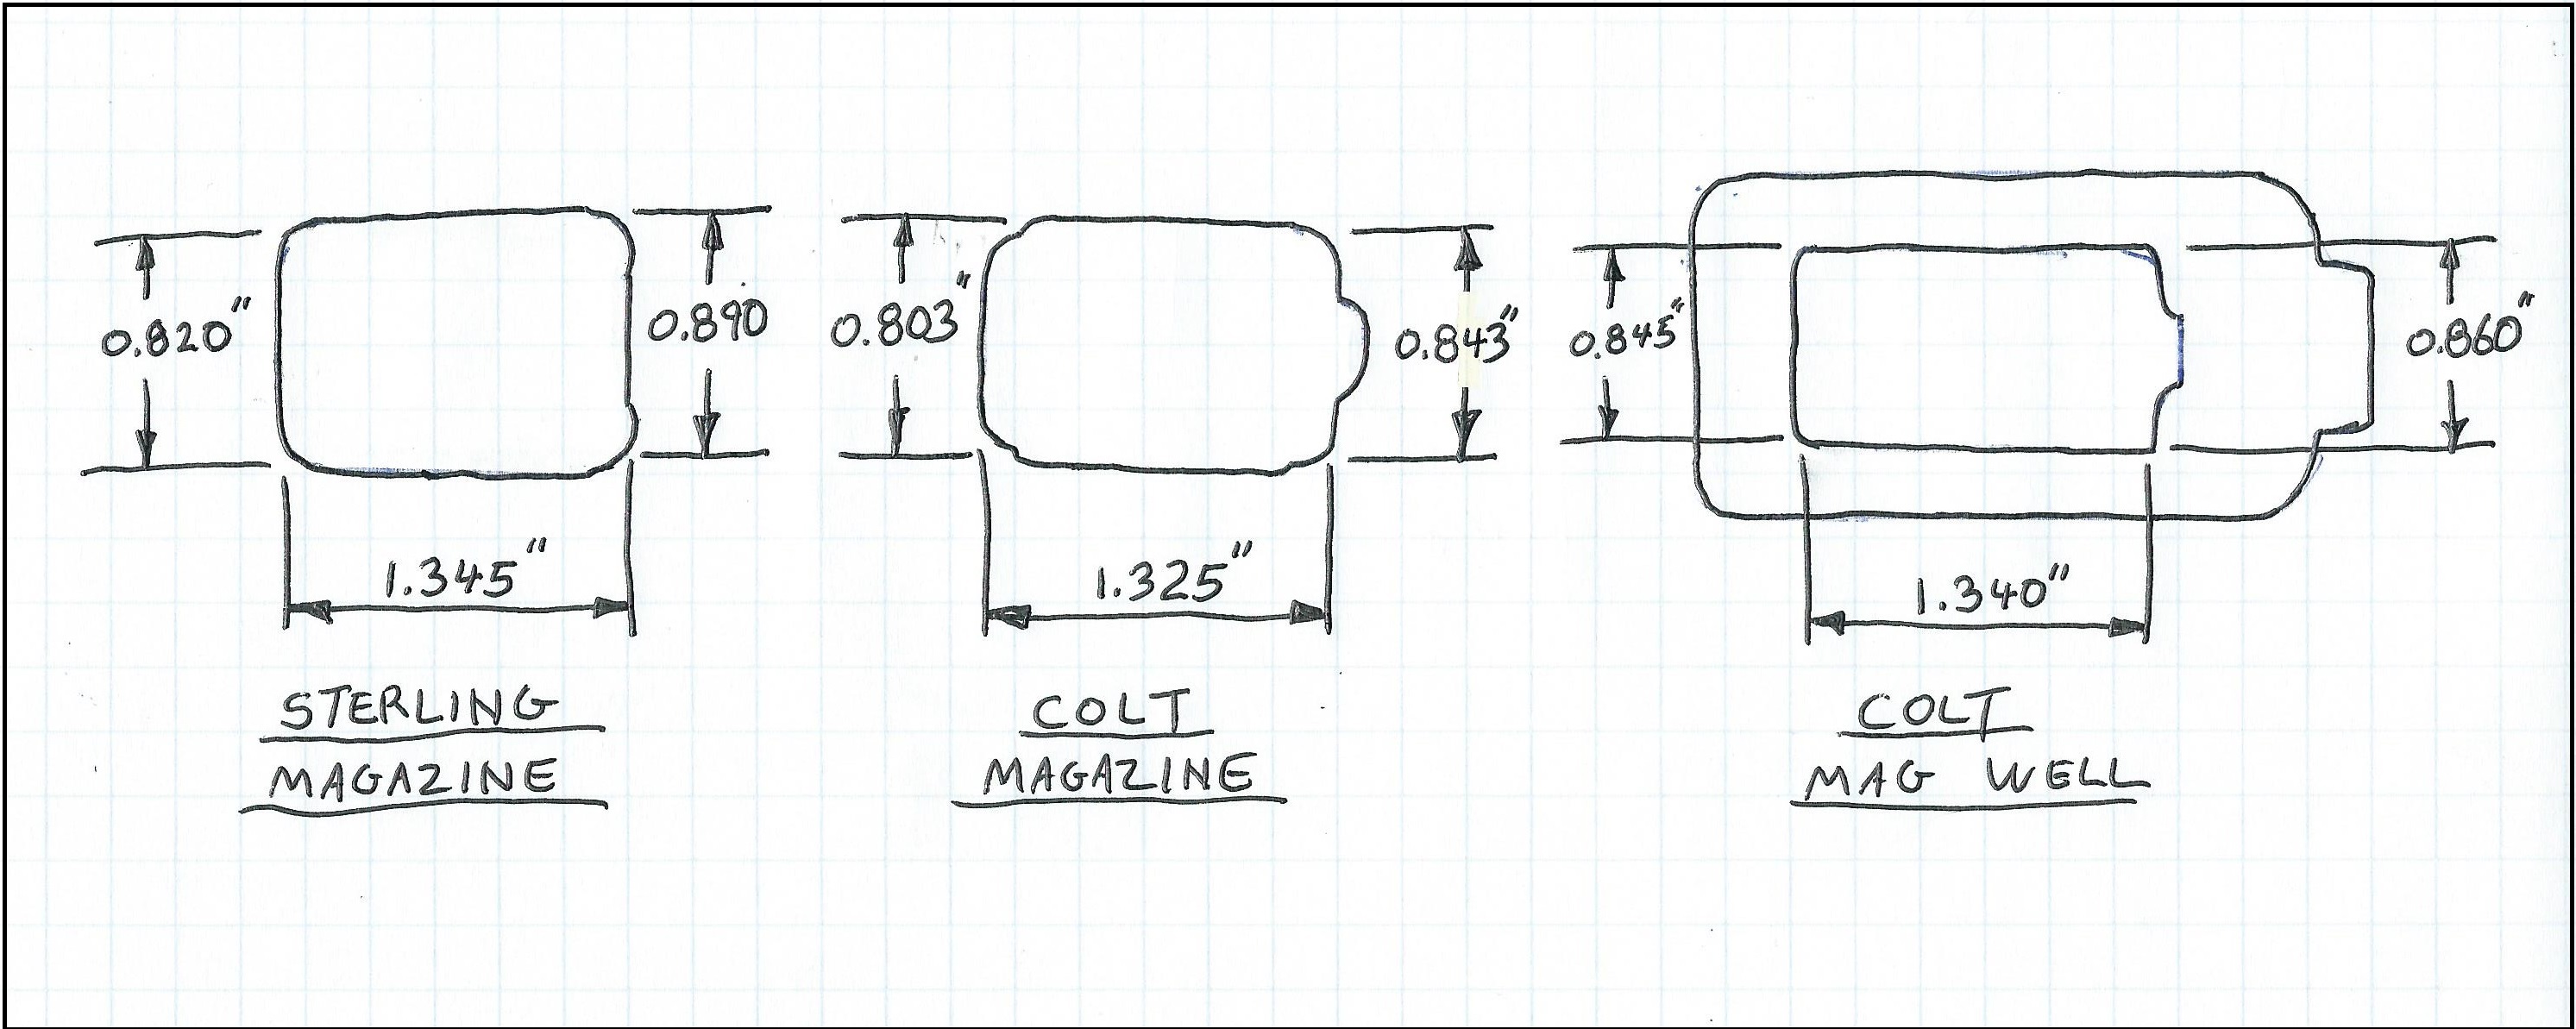
Disclaimer: I’m not a machinist. My hands aren’t as steady as they once were nor my eyesight as good. So don’t take the dimensions shown above as exact. I just wanted to give an idea of the difference in the two magazines and the mag well we’re trying to jam them into.
Comparing the Colt mag to the mag well, we find there is between 0.010” and 0.020” clearance on the sides. Front and rear clearance is closer to 0.008”. It doesn’t seem like much, but if you put the magazine in the mag well, it wobbles around quite a bit. You can make the tolerances tighter, but the magazine will be very hard to get in and out of the mag well.
Comparing the Sterling magazine to the Colt mag well, we see that the front of the magazine will easily fit in the mag well with the same 0.010” clearance as shown below. Looking at the rear of the Sterling magazine, we see that it is 0.030” bigger than the rear of the mag well. Add a minimum side clearance of 0.010” for each side and we get the required width of the rear of the mag well as 0.910”. So 0.050” (50/1000″) needs to be removed from the rear part of the sides of the mag well.
The front to rear difference between the Sterling magazine and the mag well is 0.005” Add 0.010 clearance at the front and back and we a required length of the mag well as 1.365”. Or 0.025” total needs to be removed from the front or rear of the mag well. Or a combination of both. After figuring out all of these numbers, I never looked at them again. The rest is just file a little, check the fit, continue till it slides in smoothly
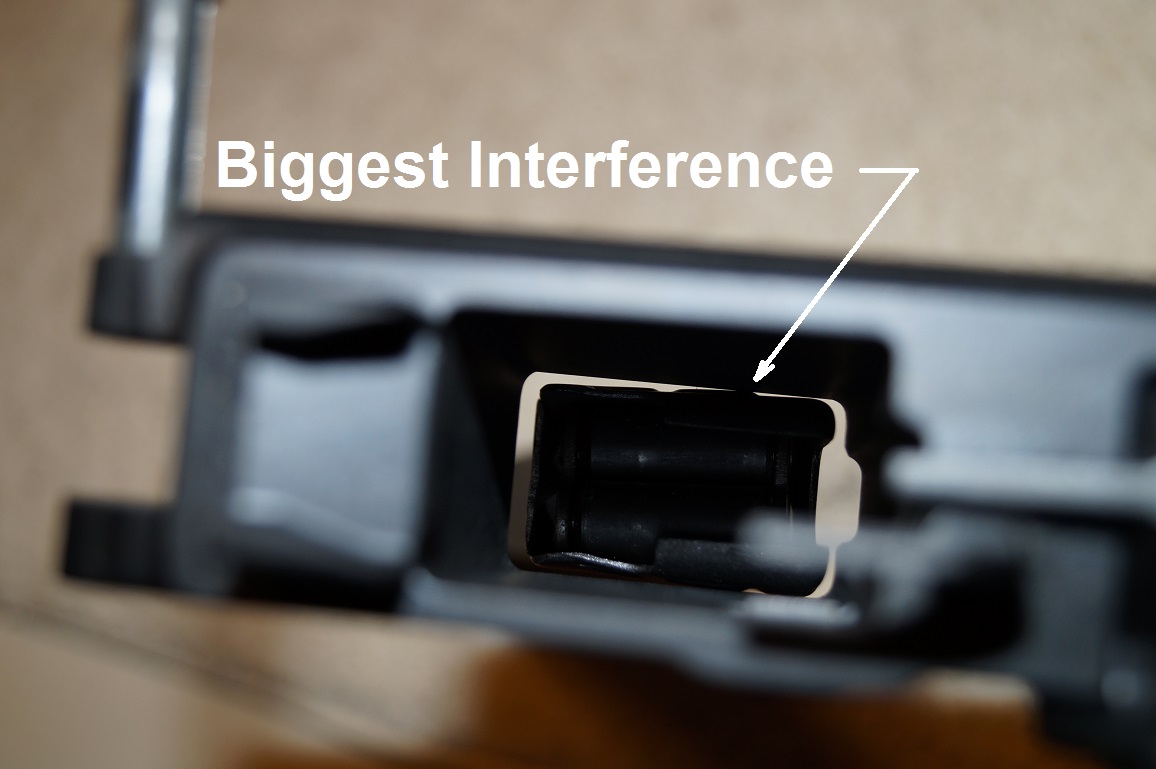
Looking at the above photo, you can see where the biggest interference is. This is where you start filing. Use a flat file. Make sure the file stays flat against the side of the mag well so you don’t remove more metal from the top, or bottom. File the same number of strokes on each side. Stop and test fit. Once the rear of the magazine starts to fit in the mag well, you’ll have to start filing the back of the mag well. Insert the magazine into the mag well as far as it will go, hold it up to the light to determine where the interference is and file that area.
Eventually, the magazine will slide in until it is stopped by what is left of the flat spring bracket on the back of the magazine. The flat spring bracket is needed to compensate for the magazine being curved. Continue with a combination of removing metal from the back of the mag well and from the bracket. I took off very little from the front of the mag well, most metal was removed from the back. But don’t file so much off of the back that you file into the hole that holds the ejector in place.
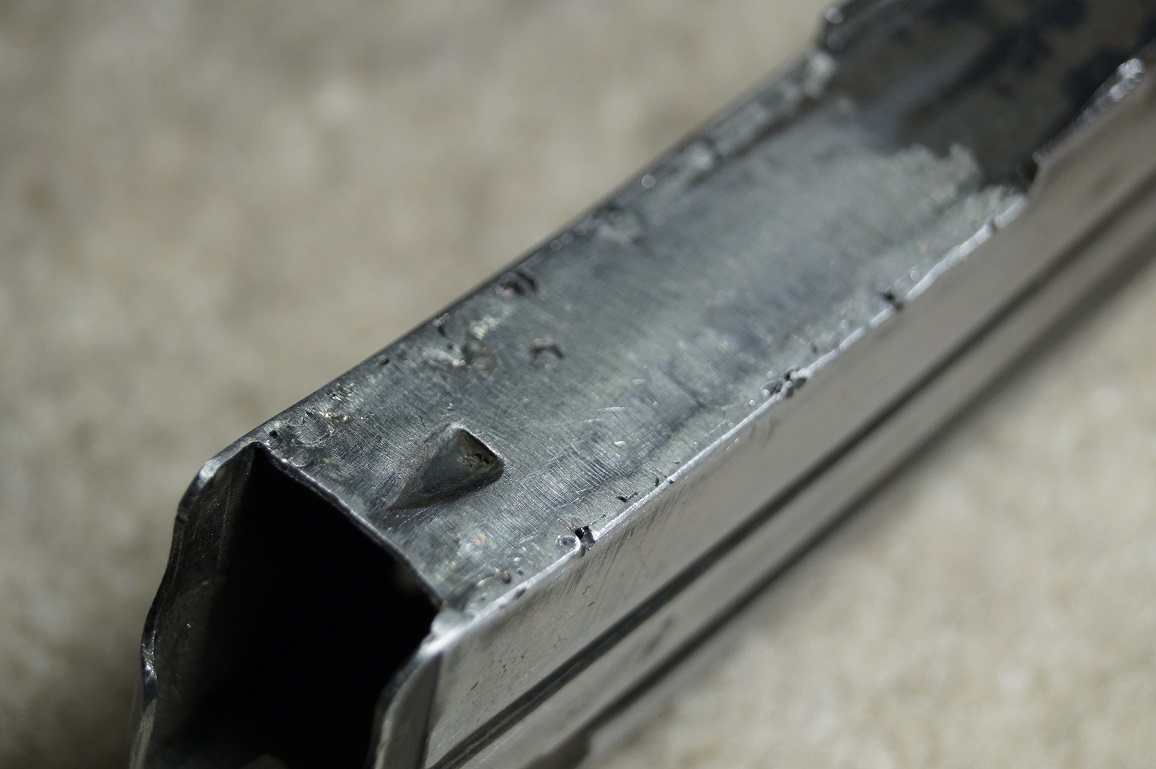
Keep removing metal until the magazine will slide in and the top of the magazine sticks out the top of the magwell. Reinstall the ejector. Carefully continue to enlarge the magwell until the top of the magazine is even with the bottom of the ejector. Once you reach this point, insert the magazine in the mag well and with a black sharpie, mark the location of the hole required in the magazine for the mag catch. Remove the magazine and with a cutting wheel in the Dremel, cut out the opening. Cut the opening undersized. Insert the magazine back in the mag well, look through the magazine catch hole and you can see where metal needs to be removed. Reinstall the magazine catch and insert the magazine. Continue to file out the hole a little at a time until the magazine catch fits into the hole and retains the magazine in the receiver.
Now that the magazine catch will hold the magazine in the proper location, you can fine tune the fit. You want the magazine to have as little movement in the well as possible, but can be inserted without hanging up and drop free when the magazine release button is pushed. If there are file marks in magazine well, remove these with emery paper. Reassemble the magazine with the spring, follower and baseplate. Continue to use emery paper on the points of contact between the magazine and the mag well until the magazine will drop free on its own. Reinstall the bullet guide on the lower receiver.
For the last bit of fitting, assemble the upper and lower receivers. Lock the bolt to the rear. Insert the magazine. With the charging handle, pull the bolt back and slowly ease it forward. If the notch you cut in the rear of the magazine isn’t big enough, the bolt will hang up on the magazine. Look in the ejection port and you can see where it is hanging up. Lock the bolt to the rear, remove the magazine and slightly enlarge the right side of the notch only. The protrusion on the bottom of the bolt that hangs on the magazine isn’t centered on the bolt. It sits more to the right. I never had to make any adjustment to the left side. Don’t file off too much or the magazine may not hold the top round in the magazine.
Once the bolt will go forward with the magazine in, lock the bolt to the rear, remove the magazine, load four or five rounds in the magazine. Dummy rounds would be best. Insert the magazine and pull down on it to make sure it locked in place. Press the bolt release and let the bolt slam forward. Check to see that the bolt went all the way forward. Pull the bolt back and let it slam forward. Observe that a round is ejected. Do this until the magazine is empty. The bolt will not lock back when the magazine is empty, the only flaw to this setup.
If your gun passes this test, it should run just fine if it ran well before making this modification. When I modified my lower receiver, it was new, out of the box. It had never been assembled as a gun and fired. In retrospect, this could have been a mistake. I’ve read that 9mm AR’s sometimes have problems functioning reliably until you can find the right combination of buffer weight, recoil spring and ammunition. Add in another variable of using a modified magazine and sorting out a problem becomes even more difficult.
Converting the Commercial Sterling SMG Magazine
The commercial Sterling magazine is much more common than the military magazine. It is heavier than the military magazine. The sides extend past the front of the magazine to allow the front piece to be spot welded to the sides. This gives the magazine a bigger appearance. I think it looks better in the AR than the military magazine. The extended sides take the place of the solid spacer block on the front of the military magazine. The bullet guide is also incorporated into the extended sides.
Grind the flanges and bullet guide off even with the front of the magazine. File smooth.
Once you grind the flange off both sides, the full length required, the front of the magazine will now move back and forth. It probably would have been better to grind one side down, weld it, then grind the other side and weld it. Or grind both sides, but skip over the spot welds, weld up the sections that were ground down, then grind down the spot welds and weld that area. This will keep the front of the magazine in the right spot. Tack weld the joint between the front and sides. A TIG welder will do a better job than I could do with my MIG welder.
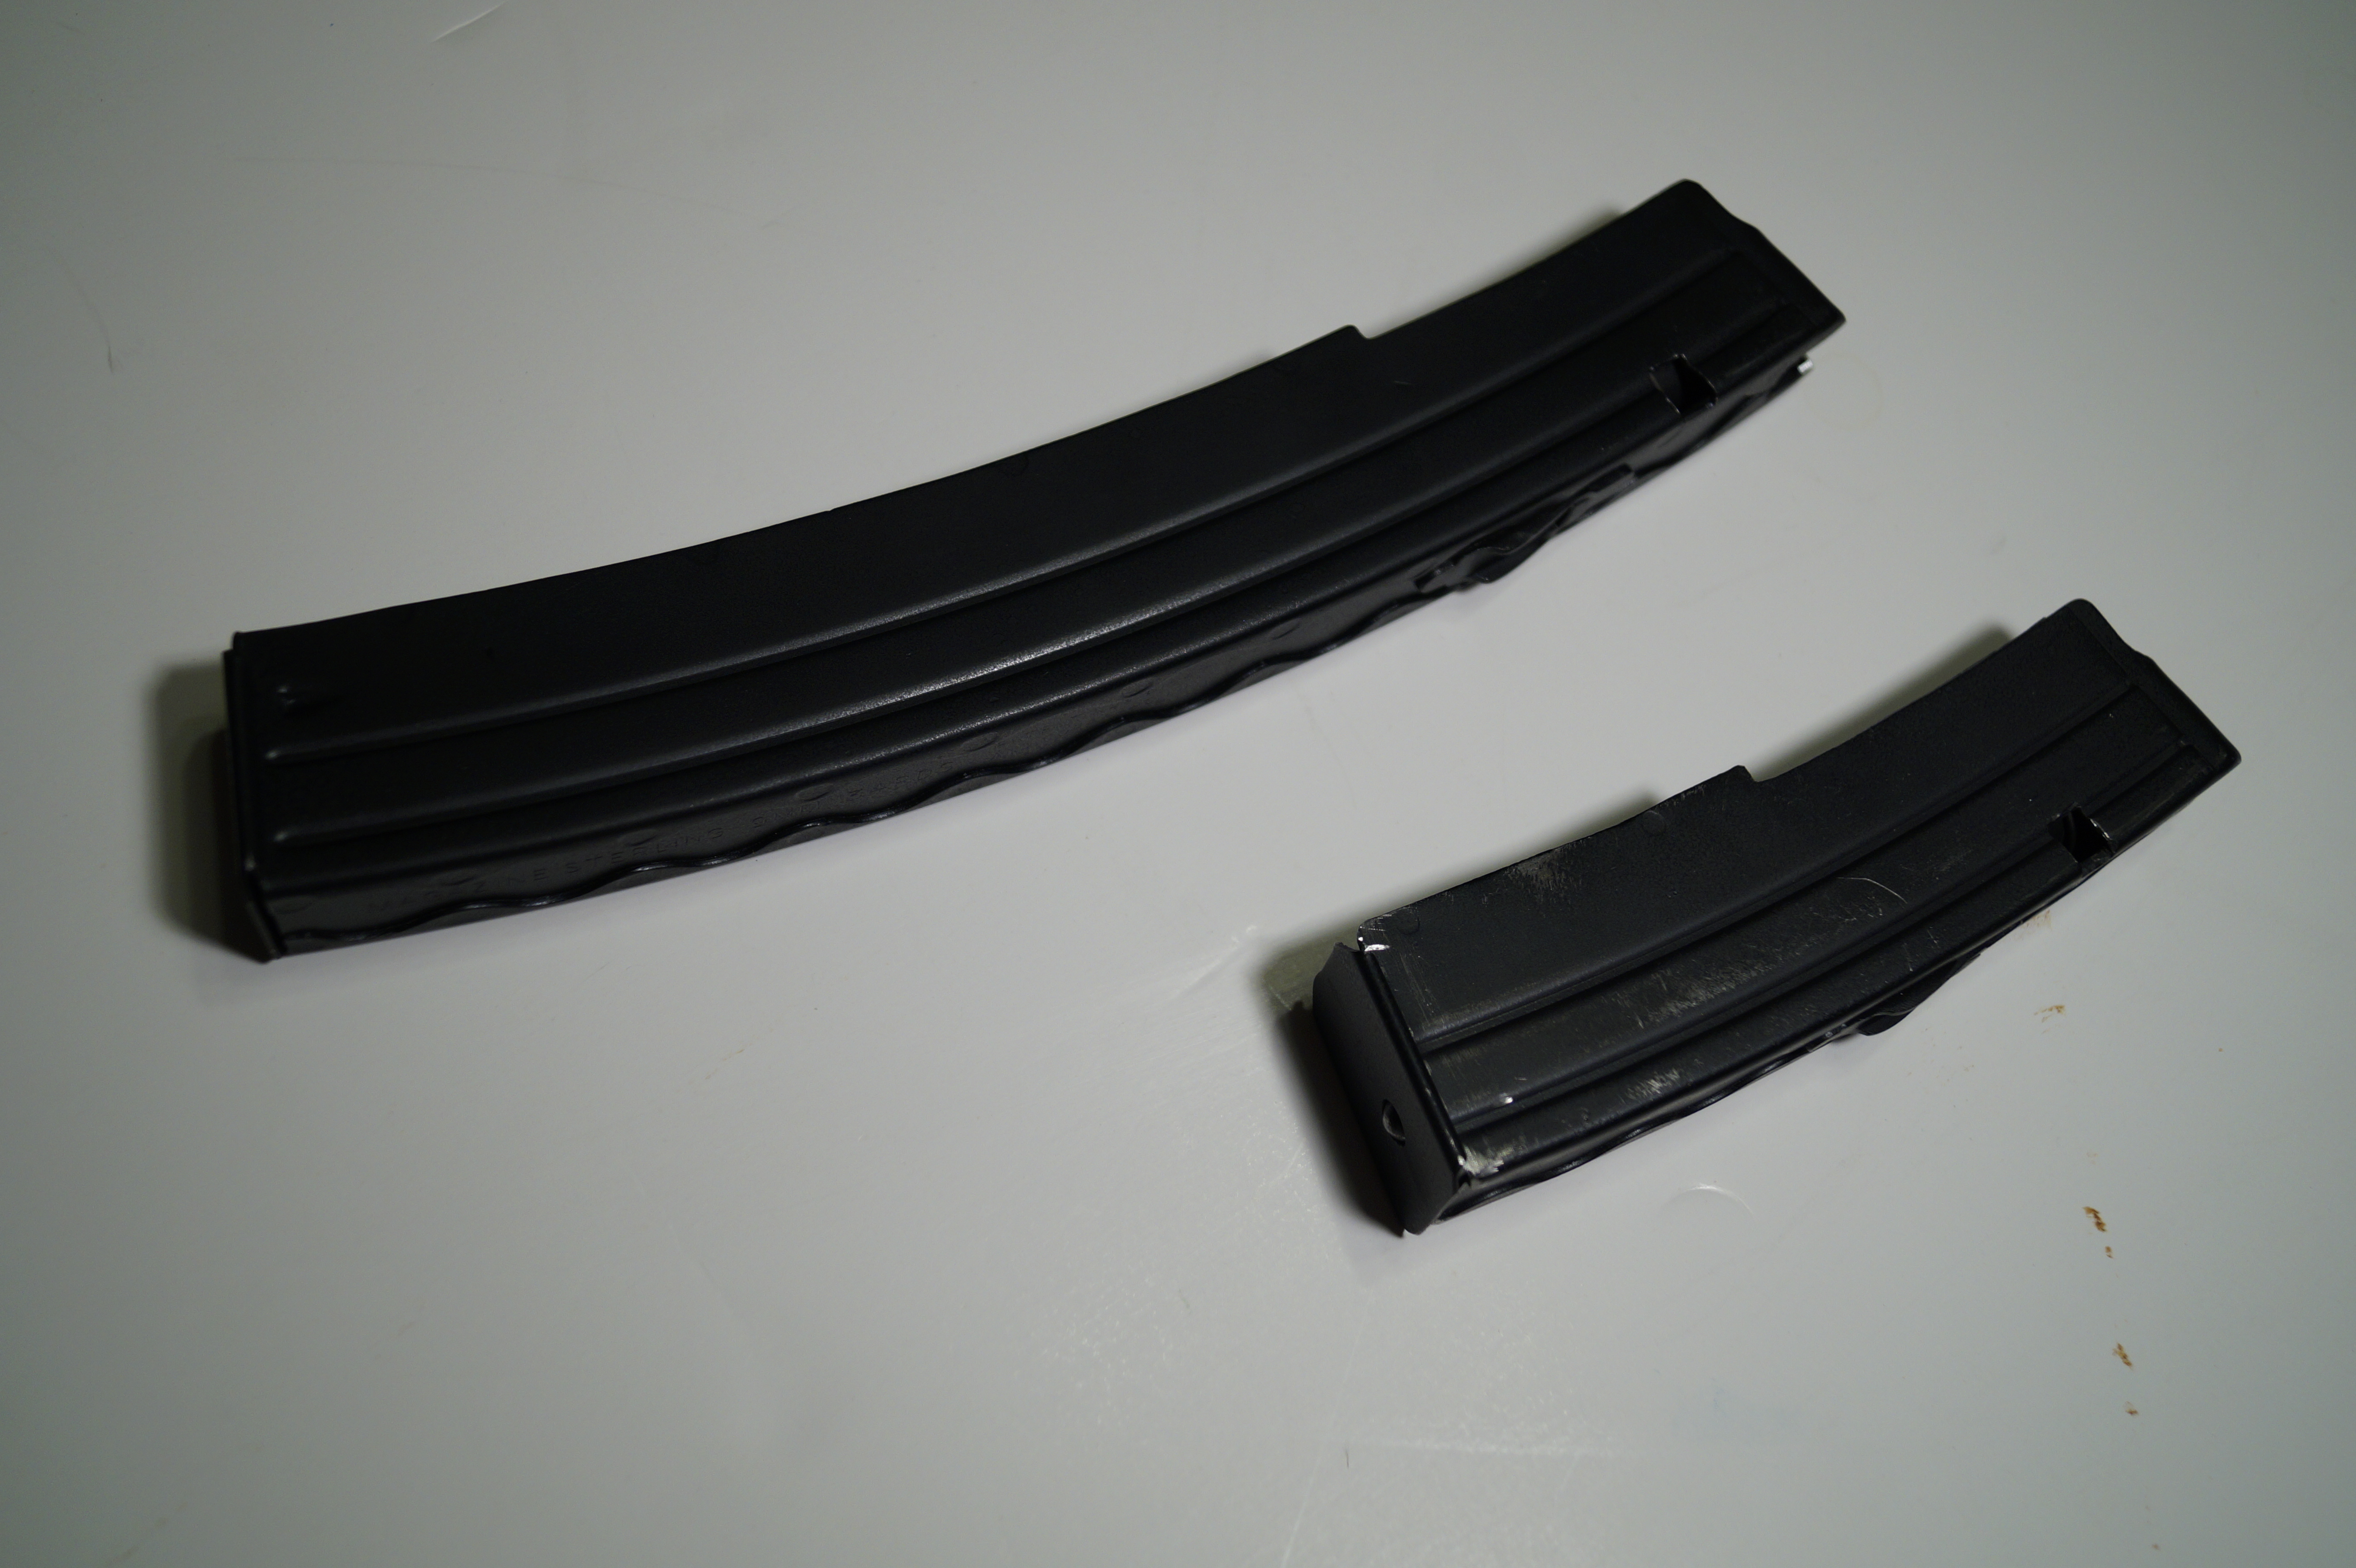
Dress down the welds. The rest of the process is the same as for the Military magazine: Remove the flat spring and pin, cut down the flat spring bracket, cut bolt notch in back of magazine, cut magazine catch hole in mag body, assemble and fine tune. Finish with the coating of your choice. I use Norrel’s Flat Black finish. Spray on with an airbrush, bake in oven for one hour and done. The finished product: The two mags in the middle are the modified ones.
One of the used commercial magazines I bought had a ding in the side that caused the follower to hang up and bind half down. Instead of trying to work the dent out, I just cut off the lower half, bent new flanges for the magazine base to slide on and cut the magazine spring to an appropriate length. Instant 15 round magazine. These short magazines really come in handy when trying to zero a gun at the range. It takes a pretty big stack of sandbags for a rest when you have a 34 round magazine sticking out the mag well.
Summary
I enjoyed building this gun. It was a little more difficult than the usual AR build where you buy a bunch of parts and put them together. I’m happy with the outcome in both operation and appearance. Time will tell if it is going to be reliable, but I have no reason to believe it won’t.
This project isn’t for everybody, especially if you’re not comfortable using hand tools or possibly destroying a $200 lower receiver. If you really, really (meaning spare no expense) want a similar gun, but aren’t handy with tools, any competent machinist or well-equipped gunsmith can do the work on the lower receiver and the magazines.
To build a similar gun, you will incur the added expense of the $200 Tax Stamp for the suppressor and the $200 Tax Stamp for the short barrel and all of the paperwork and red tape that comes with it.
On the lighter side, it would make a great Zombie gun with its light weight and 34 round magazine. The suppressor reduces it’s noise signature and we all know, noise attracts Zombies and other vermin. The four magazine pouch allows you to pack an additional 136 rounds, or 272 rounds if you carry two pouches. That’s a lot of Zombie protection.
Why do it? I learned from a counseling class a long time ago not to ask people why? It’s taken as criticism and puts them on the defensive. They feel they have to explain a decision they’ve made. There are more reasons to not do this modification than there are to do it. I’m sure many readers were making a mental list of criticisms as they read the article:
- Uses a specialized, handmade, one off magazine that can’t be purchased just anywhere.
- A mistake in the manufacturing process can ruin a $200 lower or $35 magazine.
- The exact opposite of multiple guns being able to use the same magazine.
- Uses a magazine that hasn’t been in production for over 50 years.
- Modifies a proven design into an unproven design.
- Expensive to have done by an expert.
The only reasons I could come up with to make this gun:
- Brings an easy to load magazine to the 9mm AR platform. (Best reason)
- I like the way it looks. (Worst reason, but seems to affect my gun buying decisions)
- Because I can. (Tied for worst reason)